Pages

Thursday, 12 April 2012

XenApp 6.5 Step by Step - Step 4 Configuring the Farm

Please check out www.kaztechsolutions.co.uk for more of my technical posts, alternately please call us on 01932 268289. 

Step 4 - Configuring the farm. 

Ok let me stress that this is only a test environment and there is a hell of a lot more configuration required for a XenApp environment to run smoothly, you now have to start to consider things like Citrix policies, Windows Desktop Experience, session pre-launch, HDX configurations are just among a few that spring to mind.  I will be blogging about the above soon so if this is something you would like to see documented keep your eyes peeled on ITGerrish.  

1.  On the XenApp server click on configure to start to build the XenApp Farm.

2.  As this is the first server in a new farm I have to select Create a new server farm.

3.  Give the Farm a name and make sure you're happy with the first Citrix Administrator that you are adding to the site.

4.  As this is only a test environment I will be using SQL Express as it fits my requirements but if you need to know more information regarding the setup of SQL have a look here.

5.  Add in the credentials of the users who will be used to connect to the SQL Express DB. 

6.  I've left the shadowing options as the default but if you want some more information regarding the setup of shadowing have a look here.

NOTE: By default, shadowing is enabled. Shadowing restrictions are permanent. If you disable shadowing, or change shadowing features when configuring XenApp, you cannot change those settings later. You must reinstall and reconfigure XenApp on the server to change shadowing restrictions.

7a.  As this is the first XenApp Server in the farm it will be the data collector.

7b.  As i choose to enable XML integration i cannot change the XML server port as this now shares this with IIS.

7c.  I added in the WI address that we created in Step 3.

7d. I left the remote desktop users as default too.

8.  Review the settings you have just selected and choose apply.

9.  Wait for the configurations to finish and this can take a while

10.  The installation is now finished and you need to restart your XenApp Server.

11.  Looking back at the Server Role Manager you can see that the XenApp server requires a Reboot.

12.  Once you have logged back in with the same user account that you configured the XenApp with you will see that a task are now completed.

You are doing ready to start configuring your XenApp environment and i hope you found the step by step guild helpful.

XenApp 6.5 Step by Step - Step 1 Installation

Please check out www.kaztechsolutions.co.uk for more of my technical posts, alternately please call us on 01932 268289. 

This is a installation of XenApp 6.5 step by step in a test lab setup within VMware Workstation which I've built to help me play\view some of the new features within XenApp 6.5.

Before I begin the install of XenApp 6.5 I've configured the following first
  • A Windows 2008 domain (CTXLAB.COM).
  • 2 Windows 2008 R2 64bit servers configured with my customizations and SP1 installed for the XenApp servers and the web interface.
  • A Windows 2008 R2 server for the license server.
  • A Windows 7 SP1 64bit.
Step 1 - Installing XenApp 6.5 has a few prerequisites but I'm going to let the XenApp Server Role Manager (using the Server Role Installer) to automatically install XenApp prerequisites.  Lets get started but if you are planning a deployment of XenApp 6.5 have a look at my planning guide which give you a list of questions you need to ask before even starting.

1. Insert the XenApp 6.5 media and click on install XenApp Server.

 2. Since we added no prerequisites you will be prompted to install .Net 3.5 SP1, click OK.

3.  Once the install of .Net 3.5 has finished and the Citrix XenApp Server Role Manager starts click on Add Server Roles.

4.  You will be prompted to select your edition of XenApp.

5. Agree to the license and click Next.

6.  As this is a test environment I'm going to install the XenApp and Web Interface role on the same server but if this is a production environment have a look here to see how you can split the roles out. 
 7.  I've added the XML integration as this let the Citrix XML port and IIS share port 80, if you have a requirement to separate these do not select it.

 8.  You will now be prompted about how the installation is going to plan out and what restarts are required.

9.  Review what is going to be installed and click next.

10.  As I never added some of the prerequisites the installation requires a restart.

11.  Once you clicked on finish on the previous screen you will now be prompted to Reboot the XenApp server, click on the Reboot link within role manager.

12.  Make sure you log back in to the server with the user account the you used to install XenApp with and you will be prompted to resume install, click on the resume install link.

13.  You will be presented with now what is going to be installed after the restart, click Install.
14.  Your XenApp 6.5 install is now completed, click finish
 15.  You will now be asked to configure the XenApp licensing and the Web Interface since we select this during the install. 

Now go to Step 2 to see how to configure Licensing. 


XenApp 6.5 Step by Step - Step 2 Licensing

Please check out www.kaztechsolutions.co.uk for more of my technical posts, alternately please call us on 01932 268289. 

Now moving on to Step 2 - Licensing. 

Once your XenApp Server installation is finished it's time to configure Licensing for your environment.  Please keep in mind that this is just a test environment and I will be only configuring the Citrix licensing side of things so if you plan to introduce this in to production consider your MS Remote Desktop Services too.  RDS does come with a 120 grace period so this is prefect for a test environment.

NOTE: If you are adding in Licenses to the server MAKE SURE that your License Server's computer name is ExAcTlY the same as your host name on your MyCitrix license section

1.  Once the XenApp installation has finished you will be prompted to configure the license side of things but first you need to setup a Windows Server with the Citrix License role installed.

2. I have a Windows 2008 R2 server configured to handle the licensing side of things so first thing first insert the XenApp 6.5 media.  Now the option to install the license side of things you have to drill down to find the option so click on >Manually install components>Common Components>Citrix Licensing.

NOTE: Now you need to install the Citrix Licnese server but first back sure you have .NET Framework 3.5.1 features through the add features wizard.


3.  Accept the license agreement and click next.

4.  Choose your installation directory.

5.  Click finish to the License server installation.

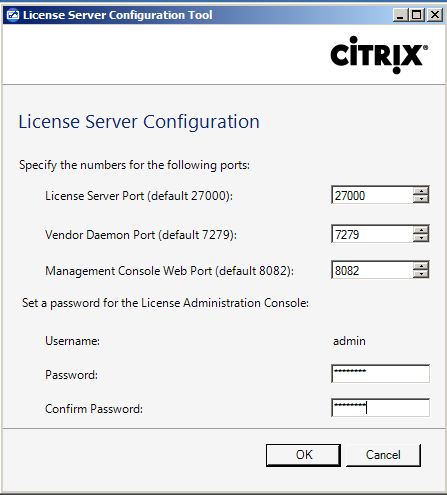
6.  Once the installation is finished you will be prompted with the configuration ports and admin password for the License Server.  


7.  Before logging on to the license console if you require to copy your License file to the MyFiles path to enable Citrix products copy it to C:\Program Files (x86)\Citrix\Licensing\MyFiles.  Now locate the License Administration Console under the all programs in your start menu, once the console starts locate the Administration link in the top right of the page and you will be prompted with log on page.  Add in the credentials that you set in section 6.


8. Once in the Administration section of the console locate the Vendor Deamon Configuration section.

9.  Browse to the directory you copied your license file and select your license, now choose to "overwrite license file on license server" and click on import license.

10.  Your license should now have imported, click on OK to message.

11.  Now restart the Citrix License Server Service and then look back at the dashboard of the License console and you should see all your licenses checked in.

12. Now go back to the XenApp Server you configured in Step 1 and click on Specify Licensing.

13.  Add in the license server name and the port number and click on Test connection.  If all connects fine click next and specify your edition and then click finish.

14.  Now looking back at the XenApp Server you will see that the Licensing is now specified.


Now that the Licensing is configured lets move to Step 3 - Configuring the Web Interface. 

XenApp 6.5 Step by Step - Step 3 Web Interface

Please check out www.kaztechsolutions.co.uk for more of my technical posts, alternately please call us on 01932 268289. 

Now moving on to Step 3 - Web Interface. 

Now I'm going to keep this really basic Web Interface (WI) installation as this is only a test lab but i may expand on it at a later date.

1.  On the XenApp Server that you installed the WI click on configure.

2.  You will be presented with a blank WI console, click on Create site in the top right corner.

3.  Now I've selected XenApp Services site as i plan to mainly use this WI with a plug in.

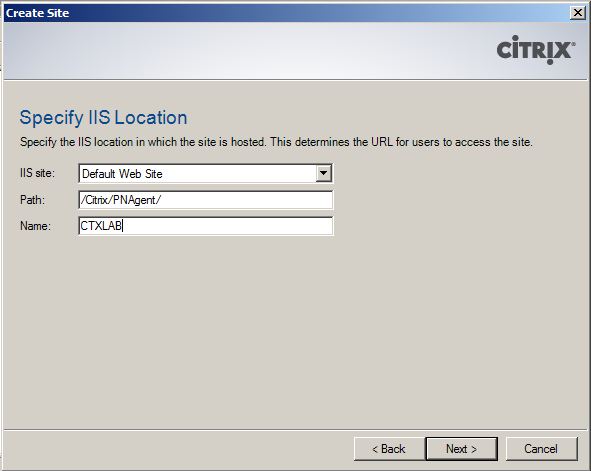
4.  Check you are happy with the location of the WI and the name of WI.

5.  Review your settings and click Next.

6.  Your site should have now been created, click Next to configure your site.

7.  Give you Farm a name (Good idea to give this the same name that you plan to give your XenApp farm) and add in the XenApp server's.  Now I only have one XenApp server at the moment in this environment but you can add to this at a later date, check the XML and transport type and click Next.

8.  Select here you plan to present applications through this WI, now I'm going to be playing with streamed and published applications through this WI so I will select dual.

9.  Click finish.

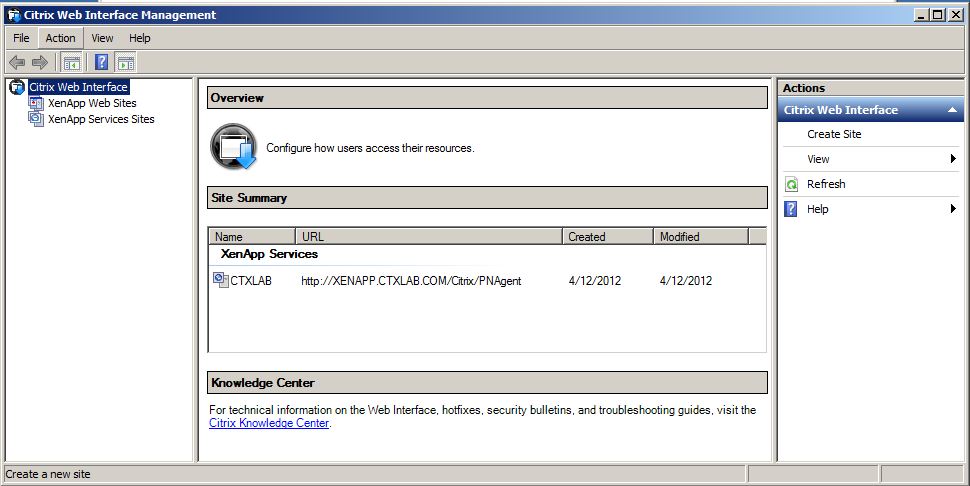
10.  You can now see that a basic WI is now configured and I'll be coming back at a later date to back some amendments. 

Moving on to Step 4 - Configuring the Farm. 

Wednesday, 21 March 2012

XenApp 6.5 Windows Server Customization

Please check out www.kaztechsolutions.co.uk for more of my technical posts, alternately please call us on 01932 268289. 

These are a list of settings that i change to a XenApp server (6 and above) before i start the install of XenApp, if you have a any additional changes that you make please let me know.  A lot of these configurations are taken from the this XenApp guide, XenAppBlog.com and my own experiences.

Configure Windows 2008 R2 with license and IP information.
Apply SP2 and latest windows updates as required.
Setup the page file to run on a drive that doesn't contain any apps - look here for info on setting up page file.
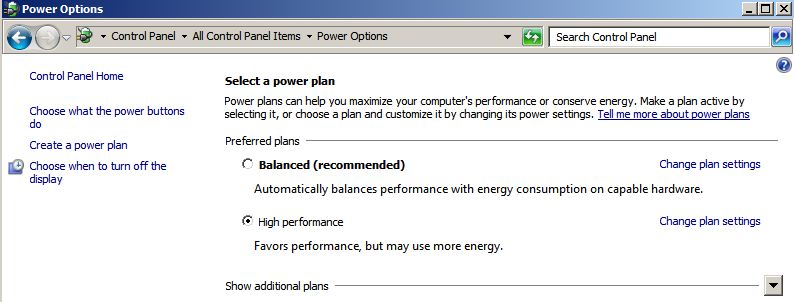
Change power setting to high performance.

Turn off IE ESC (Enhanced Security) through server manager.
Disable Data Execution Prevention on Windows 2008 : bcdedit.exe /set {current} nx AlwaysOff
Disable Windows animated boot : bcdedit /set bootux disabled

Disable Windows Scheduled tasks

  • Application Experience > AitAgent
  • Application Experience > ProgramDataUpdater
  • Autochk > Proxy
  • Customer Experience Improvement Program > everything under this node (Consolidator, KernelCeipTask, UsbCeip, ServerCeipAssistant, ServerRoleCollector, ServerRoleUsageCollector)
  • Defrag > ScheduledDefrag
  • DiskDiagnostic > Microsoft-Windows-DiskDiagnosticDataCollector
  • Power Efficiency Diagnostics > AnalyzeSystem
  • Server Manager > ServerManager
  • Windows Error Reporting > QueueReporting
Configure GPO's for XA Server - 
  • Disable UAC - User Account Control: Detect application installations and prompt for elevation
  • Disable Windows Services through GPO - Windows Firewall, Multimedia Class Scheduler, Network List Service, Network Location Awareness, Windows Defender
  • Disable Windows Updates - Configure Automatic Updates: Disabled
  • Disable Error Reporting - Disable Windows Error Reporting: Enabled
  • Disable CEIP - Turn off Windows Customer Experience Improvement Program: Enabled
  • Disable System Restore - Turn off System Restore: Enabled
  • Disable Printer mappings for RDP sessions - Do not allow client printer redirection: Enabled
  • Use Windows Group Policy Preferences to apply the following registry changes.
Hide System Hard Error Messages - HKLM\System\CurrentControlSet\Control\Windows
“ErrorMode”=dword:00000002
Spooler Warning Events - HKLM\System\CurrentControlSet\Control\Print\Providers
“EventLog”=dword:00000001
Paging of the Executive - HKLM\System\CurrentControlSet\Control\Session Manager\Memory Management
“DisablePagingExecutive”=dword:00000001
Registry Lazy Flush Interval - HKLM\System\CurrentControlSet\Control\Session Manager\Configuration Manager\
“RegistryLazyFlushInterval”=dword:00000060 (dec)
Worker Threads - HKLM\System\CurrentControlSet\Control\Session Manager\Executive\
“AdditionalCriticalWorkerThreads”=dword:00000064 (dec)
SMB 1.0 Client Optimization Note: Tuning SMB 1.0 is required in mixed (2003 / 2008 R2) environments, where SMB 2.0 cannot be used.
HKLM\SYSTEM\CurrentControlSet\Services\Lanmanworkstation\Parameters

"MaxCmds"=dword:00002048 (dec)
HKLM\SYSTEM\CurrentControlSet\Services\MRxSmb\Parameters
"MultiUserEnabled"=dword:00000001
HKLM\SOFTWARE\Microsoft\Windows\ CurrentVersion\Policies\Explorer
NoRemoteRecursiveEvents”=dword:00000001
HKLM\SYSTEM\CurrentControlSet\Services\ Lanmanserver\Parameters
"MaxWorkItems"=dword:00008192 (dec)
"MaxMpxCt"=dword:00002048 (dec)
"MaxRawWorkItems"=dword:00000512 (dec)
"MaxFreeConnections"=dword:00000100 (dec)
"MinFreeConnections"=dword:00000032 (dec)
SMB 2.x Client Tuning - HKLM\System\CurrentControlSet\Services\ LanmanWorkstation\Parameters
“DisableBandwidthThrottling"=dword:00000001
“DisableLargeMtu”=dword:00000000
HKLM\SOFTWARE\Microsoft\Windows\ CurrentVersion\Policies\Explorer
"NoRemoteRecursiveEvents”=dword:00000001
Disable Logon Screensaver - HKEY_USERS\.DEFAULT\Control Panel\Desktop
"ScreenSaveActive"="0"

And remember to optimize your Av as well using the following Citrix guide.


For more XenApp registry changes have a look at XenApp 6 Tuning GPO for Windows 2008 on XenAppBlog.com

NOTE:  Once you have your GPO setup the way you like it take a backup of it using GPMC for future use, as once you have these settings configured within a GPO you can simply import these settings back in.