Now moving on to Step 2 - Licensing.
Once your XenApp Server installation is finished it's time to configure Licensing for your environment. Please keep in mind that this is just a test environment and I will be only configuring the Citrix licensing side of things so if you plan to introduce this in to production consider your MS Remote Desktop Services too. RDS does come with a 120 grace period so this is prefect for a test environment.
NOTE: If you are adding in Licenses to the server MAKE SURE that your License Server's computer name is ExAcTlY the same as your host name on your MyCitrix license section
1. Once the XenApp installation has finished you will be prompted to configure the license side of things but first you need to setup a Windows Server with the Citrix License role installed.

2. I have a Windows 2008 R2 server configured to handle the licensing side of things so first thing first insert the XenApp 6.5 media. Now the option to install the license side of things you have to drill down to find the option so click on >Manually install components>Common Components>Citrix Licensing.
NOTE: Now you need to install the Citrix Licnese server but first back sure you have .NET Framework 3.5.1 features through the add features wizard.

3. Accept the license agreement and click next.

4. Choose your installation directory.

5. Click finish to the License server installation.

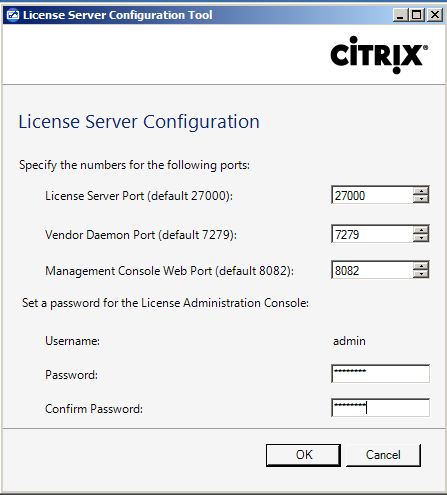
6. Once the installation is finished you will be prompted with the configuration ports and admin password for the License Server.
7. Before logging on to the license console if you require to copy your License file to the MyFiles path to enable Citrix products copy it to C:\Program Files (x86)\Citrix\Licensing\MyFiles. Now locate the License Administration Console under the all programs in your start menu, once the console starts locate the Administration link in the top right of the page and you will be prompted with log on page. Add in the credentials that you set in section 6.

8. Once in the Administration section of the console locate the Vendor Deamon Configuration section.

9. Browse to the directory you copied your license file and select your license, now choose to "overwrite license file on license server" and click on import license.

10. Your license should now have imported, click on OK to message.

11. Now restart the Citrix License Server Service and then look back at the dashboard of the License console and you should see all your licenses checked in.
12. Now go back to the XenApp Server you configured in Step 1 and click on Specify Licensing.

13. Add in the license server name and the port number and click on Test connection. If all connects fine click next and specify your edition and then click finish.

14. Now looking back at the XenApp Server you will see that the Licensing is now specified.

Now that the Licensing is configured lets move to Step 3 - Configuring the Web Interface.
Thanks Will. This was very helpful. Looking forward to the next posts.
ReplyDeleteThis is very helpful...
ReplyDelete