Please check out www.kaztechsolutions.co.uk for more of my technical posts, alternately please call us on 01932 268289.
I was recently
at a client that had a requirement to migrate their Datastore from an old
XenApp server to the enterprise class SQL cluster, the only problem was that
the Datastore was a SQL Express 2005 database and which was due to go on to a
SQL 2008 instance.
Citrix
offers good pointers for migrating from Access to SQL/Oracle, Oracle to SQL,
SQL to Oracle and same version SQL to SQL but nothing for SQL Express to SQL.
Migrating
from one database version to the other might be necessary to move the data
store to a more powerful server. The best method for migrating between versions
of the database is to back up and restore the database using the utilities
provided by the database software vendor.
To point a
Citrix XenApp Server farm to a new database complete the following steps. For
the best performance, complete this procedure on the data collectors after all
other servers are reconfigured.
Back up the existing farm database.
Create a new blank database on the destination SQL instance
Create a new DSN file that points to the new database:
Click Start
-> Administrative
Tools -> Data Sources (ODBC).
"Open Database
Connectivity (ODBC) is Microsoft's strategic interface for accessing data in a
heterogeneous environment of relational and non- relational database management
systems. Based on the Call Level Interface specification of the SQL Access
Group, ODBC provides an open, vendor- neutral way of accessing data stored in a
variety of proprietary personal computer, minicomputer, and mainframe
databases.
ODBC alleviates the need for independent software vendors and corporate
developers to learn multiple application programming interfaces. ODBC now
provides a universal data access interface. With ODBC, application developers
can allow an application to concurrently access, view, and modify data from
multiple, diverse databases."
Click the File DSN
Tab.
User
DSN: The User DSN is a data source that is user-specific. A
User DSN is stored locally but is available only to the user who creates it.
System DSN:
Unlike a User DSN, a System DSN is not user-specific. A System DSN is stored
locally and is not dedicated to a particular user. Any user who logs on to a
computer that has permission to access the data source can use a System DSN.
Some programs, such as Microsoft SQL Server or Microsoft Internet Information
Server (IIS), require a System DSN. This DSN must be created on the server
where the program is located. System DSNs are stored in the Windows registry
under the following key: HKEY_LOCAL_MACHINE\Software\Odbc\Odbc.ini\Odbc Data
sources
File DSN:
The File DSN is created locally and can be shared with other users. The File
DSN is file-based, which means that the .dsn file contains all the information
required to connect to the data source. Note that you must install the ODBC
driver locally to use a File DSN. File DSNs are not stored in the Windows
registry. The .dsn file is a text file that you can view in any text editor,
such as Microsoft Notepad.
Change the Look
in to C:\Program
Files\Citrix\Independent Management Architecture.
The new DSN must be placed in this folder. The IMASERVICE service
is programmed to look in only this folder.
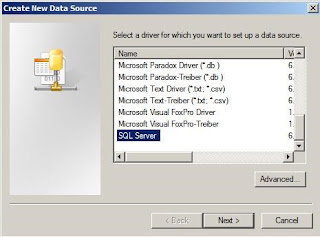
Click the Add
button.
Click on SQL Server
and click Next.
Type in C:\Program
Files\Citrix\Independent Management Architecture\WebsterFarmDSMF20.dsn and
click Next.
Note: The DSN
can be named anything as long as it has a .dsn file extension. It does
not need to contain "MF20" anywhere in the name.
Click Finish.
Enter a Description
and type in the name of the SQL Server and click Next.
If a successful
connection to the SQL Server is made click Next. A common
problem is the Windows Firewall is not configured to allow SQL traffic (TCP
Port 1433). To configure an instance of SQL Server 2005 to use a static
port, follow the steps described in the "How to: Configure a Server to
Listen on a Specific TCP Port (SQL Server Configuration Manager)" topic in
SQL Server 2005 Books Online.
Note:
If SQL Server is set to use a static port, click Client Configuration, then
uncheck Dynamically
determine port and enter the value for the static port number.
If the account listed in the grayed
out Login ID authenticates successfully to the SQL Server, Change the
default database to the new SQL Server data store and click Next.
Note: One problem
could be the Login ID account is not setup to access the SQL Server.
Click Finish.
Click Test Data Source.
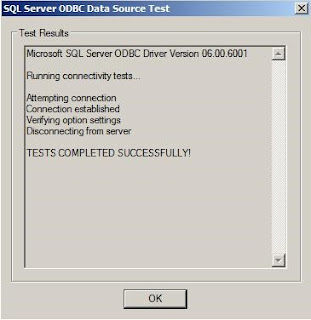
Click OK.
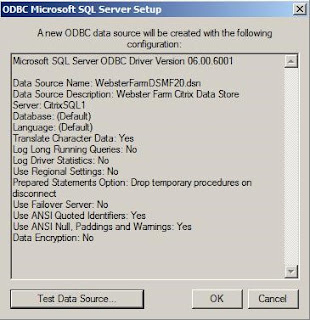
Your new DSN is
created. Click OK.
Run the dsmaint config
command on the server with the new DSN file:
dsmaint CONFIG
/user:LAB\Administrator /pwd:Password1 /dsn:"C:\Program Files (x86)\Citrix\Independent
Management Architecture\XA65LABDS.dsn"
Stop and restart the IMA
Service.
Important: Restarting the IMA Service instead of restarting the server
might cause the SNMP service to initiate Dr. Watson if SNMP is enabled. This
error is benign.
Ensure that the server is
pointing to the new data store by checking the following registry setting:
HKEY_LOCAL_MACHINE\SOFTWARE\Citrix\IMA\DataSourceName
If the IMA Service started
successfully, copy the new DSN file to all servers in the farm.
Run the dsmaint config
command to change the IMA Service configuration on all remaining servers in the
farm.
Stop and restart the IMA
Service on all servers in the farm.


