Pages

Monday, 19 March 2012

Enabling Desktop Viewer on XA and XD

Please check out www.kaztechsolutions.co.uk for more of my technical posts, alternately please call us on 01932 268289. 

Some times you may notice that the desktop viewer bar is not avaliable when you connect to a XD or XA but you can enable this with the following to ensure that the Desktop Viewer bar is always used for XD session while you have implemented the preceding change for a single Web Interface site that contains both XenDesktop farm and XenApp farm.


  • Ensure that the c:\inetpub\wwwroot\citrix\SiteName\conf\default.ica file does not contain a line ConnectionBar=0 or ConnectionBar=1
  • If you require an app to show as a desktop change the following .conf file


  • Ensure that the c:\inetpub\wwwroot\citrix\SiteName\conf\webinterface.conf file has the line, ShowDesktopViewer=On. The default content for this line could be #ShowDesktopView=Off.

Wednesday, 14 March 2012

XenApp 6.5 Planning

Please check out www.kaztechsolutions.co.uk for more of my technical posts, alternately please call us on 01932 268289. 

I always find when doing any kind of Citrix deployments whether it be test labs, pre-production or live systems there is an awful lot to consider before you even start to plan your roll out - and rightly so. A lot of this is for my own use and just to jog my memory form time to time and also to make sure i don't miss anything out of the planning side of things. If you would like to add something to this or let me know the way you go about planning a XenApp 6.5 please let me know.


Hardware and Software considerations
  • What hardware will you be using? How much RAM does the server, what are the CPU's and their spec, what disks are going to be used and their speed.
  • Windows licensing? What edition of OS are you going to be using? Std, Ent or DataCenter.
  • Do you have your Windows RDS licensing?
  • What OS do you plan to install XenApp on and is it 32bit of 64bit?
  • What hypervisor do you plan on using? XenServer, VMware, Hyper-V?
  • What Citrix Licensing do you have and what model do you have? Concurrent or user/device? 

Application/User Considerations
Networking Considerations 

XenApp Server Configuration Considerations
Installing XenApp

Configuring XenApp
- Are you joining an existing farm or a new one?
- If creating a new farm have the name and domain ready.
- Select the data store database type and connection information.
- Do you have the database credentials?
- Are you going to use shadowing?
- What server mode and zone name?
- Do you have the licensing information?
XenApp Security
Migration Considerations

Friday, 18 November 2011

XenServer - Lost interfaces

Please check out www.kaztechsolutions.co.uk for more of my technical posts, alternately please call us on 01932 268289. 

I recently ran in to an issue where in my XenServer test environment i seemed to lose all 4 of the NICs that was in my XenServer and the XenServer host could not be seen in XenCenter.

Looking at it closer when in XSCONSOLE and you looked at the management interface section you would get a message back saying "no interfaces present" and in the CLI if you were to run a xe pif-list you would get a message back saying "Host is still booting".

If you were to also run a ifconfig on the XenServer host would would even get back a list of all eth's, bond, xapi and xebr's.

I found out that running the xe pool-emergency-transition-to-master would resolve this issue. Once you have run this command wait around 30 seconds and then restart the host and it was now able to be seen within XenCenter.

Friday, 28 October 2011

Runas VBS script

Let me start by saying that by no means im a scripting guy this is more for my own needs. copy all the below test in to notepad and save as a VBS.

Option explicit
Dim oShell
set oShell= Wscript.CreateObject("WScript.Shell")
oShell.Run "RunAs /noprofile /user:domain\administrator ""c:\path\to\prog.exe""",2 "use the ,2 to minimize the DOS box that will run your program"
WScript.Sleep 500
oShell.Sendkeys "PASSWORD~" "remember to keep the ~ as this sends an enter after your password"
Wscript.Quit

Tuesday, 25 October 2011

Find memory/CPU reservation on all VMs

To retrieve the settings for reservation of both memory and CPU run the following PS script

## retrieve the values for MemReservationMB for the given VMs
Get-Cluster "myCluster" | Get-VM | Get-VMResourceConfiguration | select VM,MemReservationMB


## retrieve the values for CPUReservationMhz for the given VMs
Get-Cluster "myCluster" | Get-VM | Get-VMResourceConfiguration | select VM,CPUReservationMhz


If you want to go through a set all VM memroyCPU reservations to "0" run the following

## set the MemReservationMB to 0 for given VMs
Get-Cluster "myCluster" | Get-VM | Get-VMResourceConfiguration | Set-VMResourceConfiguration -MemReservationMB 0 -Confirm:$false


## set the CPUReservationMhz to 0 for given VMs
Get-Cluster "myCluster" | Get-VM | Get-VMResourceConfiguration | Set-VMResourceConfiguration -CPUReservationMhz 0 -Confirm:$false

Tuesday, 4 October 2011

VMware PS Script to export Datastores Information

Get-View -ViewType Datastore | %{
$_ | Select Name,
@{N="Location";E={$_.Summary.Url}},
@{N="Type";E={$_.Summary.Type}},
@{N="Hosts Connected";E={$_.Host.Count}},
@{N="VMs Connected";E={$_.Vm.Count}},
@{N="Capacity";E={"{0:n2} GB"-f ($_.Summary.Capacity/1GB)}},
@{N="Provisioned";E={"{0:n2} GB"-f (($_.Summary.Capacity - $_.Summary.FreeSpace + $_.Summary.Uncommitted)/1GB)}},
@{N="Free";E={"{0:n2} GB"-f ($_.Summary.FreeSpace/1GB)}}
} | Export-csv ("c:\VMreports\Datastore-"+$a+".csv")

Thursday, 8 September 2011

XenApp 6 Event ID 1 error

Hi you run in to the following error on your XenApp server's do the following

Event Type: Error
Event Source: WSH
Event Category: None
Event ID: 1
Date: 2008-02-18
Time: 20:26:38
User: N/A
Description:
Citrix Generate License Performance Data:
Error calculating license information:
Received error: 0x800a0005: Invalid procedure call or argument


1. Go to your License server.
2. Go into C:\Program Files\Citrix\Licensing\LicWMI
3. Make a backup of Citrix_Licensing_WMI.mof - Make sure the backup does NOT have a .mof extension.
4. Open Citrix_Licensing_WMI.mof in Notepad.
5. Remove HostingModel = "LocalServiceHost";
6. Open CMD.exe, change to the dirirectory listed in step 2, run the following command:
for /f %s in ('dir /b *.mof *.mfl') do mofcomp %s

Monday, 22 August 2011

XenServer 5.6 SP2 Install

Boot the computer from the installation CD and follow the initial boot messages and the Welcome to XenServer screen, select your keyboard layout for the installation.

Tip: Throughout the installation, quickly advance to the next screen by pressing F12. Use Tab to move between elements, and Space or Enter to select. For general help, press F1.


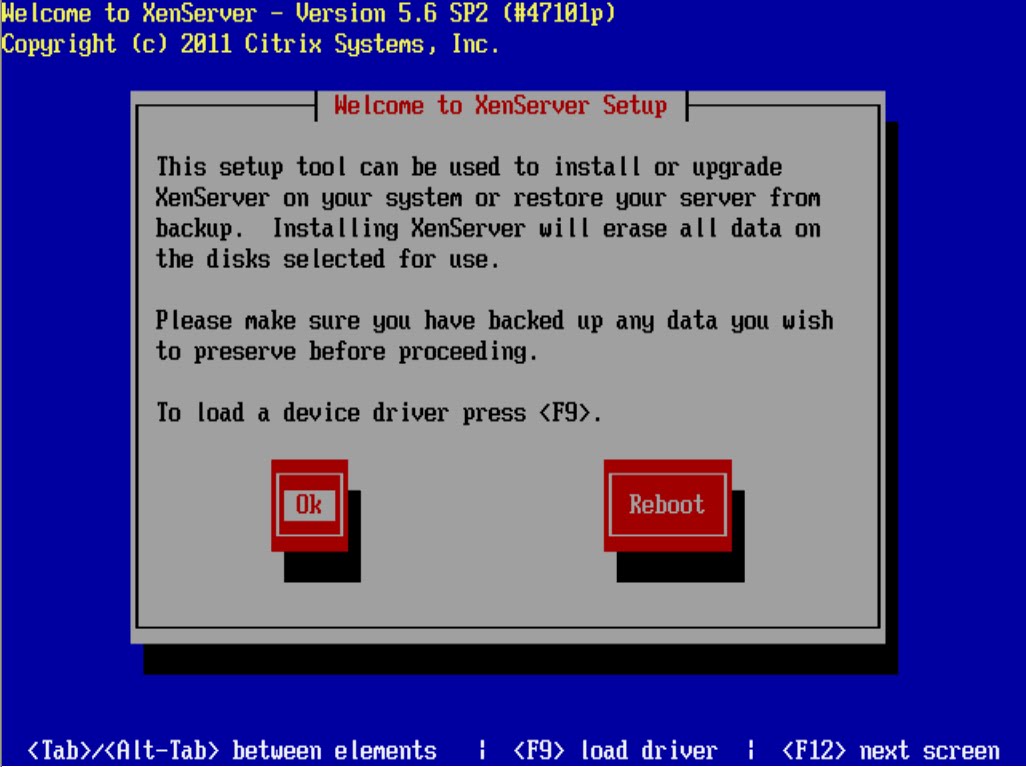
The Welcome to XenServer Setup screen is displayed.

XenServer ships with a broad driver set that supports most modern server hardware configurations.
However, if you have been provided with any supplemental packs containing additional essential drivers, press F9. The installer will then step you through installing the necessary drivers.
Once you have installed all of the required drivers, select Ok to proceed.


The XenServer End User License Agreement (EULA) is displayed. Use the Page Up and Page Down keys to scroll through and read the agreement. Choose Accept EUlA to proceed.


Select an installation action, as appropriate. You may see any of the following options:

• Perform clean installation
• Upgrade: if the installer detects a previously-installed version of XenServer, it offers the option to upgrade. For details on upgrading your XenServer host, see Upgrading XenServer.
• Restore: if the installer detects a previously-created backup installation, it offers the option to restore XenServer from the backup. For details, see the XenServer Administrator's Guide.

Make your selection, and choose Ok to proceed.

If you have multiple local hard disks, choose a Primary Disk for the installation. Select Ok.
Choose which disk(s) you would like to use for virtual machine storage. Information about a specific disk can be viewed by pressing F5.

If you want to use Thin Provisioning to optimize the utilization of available storage, select Enable thin provisioning. XenDesktop users are strongly recommended to select this option in order for local caching to work properly. For details, see XenServer and IntelliCache.
Choose Ok.


Select your installation media source


Indicate if you want to verify the integrity of the installation media. If you select Verify installation source, the MD5 checksum of the packages is calculated and checked against the known value. Verification may take some time. Make your selection and choose Ok to proceed.


Skip verification


Set and confirm a root password, which XenCenter will use to connect to the XenServer host. You will also use this password (with username "root") to log into xsconsole, the system configuration console.


Set up the primary management interface that will be used to connect to XenCenter.


Set up the primary management interface that will be used to connect to XenCenter.


Configure the Management NIC IP address by choosing Automatic configuration (DHCP) to configure the NIC using DHCP, or Static configuration to manually configure the NIC.


Select your time zone — the geographical area and then city. You can type the first letter of the desired locale to jump to the first entry that begins with this letter. Choose Ok to proceed.


If using NTP, either select NTP is configured by my DHCP server to have DHCP set the time server or enter at least one NTP server name or IP address in the fields below. Choose Ok.
Note: XenServer assumes that the time setting in the BIOS of the server is the current time in UTC.


Select Install XenServer.


From the Installation Complete screen, eject the installation CD (if installing from CD) and select Ok to reboot the server.

Friday, 15 July 2011

The MAC address challenge – XenDesktop on vSphere

http://blogs.citrix.com/2011/07/09/the-mac-address-challenge-xendesktop-on-vsphere/

http://kb.vmware.com/selfservice/microsites/search.do?language=en_US&cmd=displayKC&externalId=1024025

Wednesday, 22 June 2011

Deleting Multiple VM's from XenCenter

First use excel (or your choice of word editor) and create a list of all your VM's you would like to delete plus the added XE command options

xe vm-uninstall vm=VM1 force=true
xe vm-uninstall vm=VM2 force=true
xe vm-uninstall vm=VM3 force=true
xe vm-uninstall vm=VM4 force=true
xe vm-uninstall vm=VM5 force=true
xe vm-uninstall vm=VM6 force=true
xe vm-uninstall vm=VM7 force=true
xe vm-uninstall vm=VM8 force=true
xe vm-uninstall vm=VM9 force=true


Next open up a putty session to a Xen Host and copy all of the above next directly in to the putty session.

NOTE: Please be aware that the VM names are CaSe Sensitive.

As the text is processed you'll see each VM being delete and you can also view the VM's being deleted in XenCenter as each line of command runs in the putty session.

[root@XENHOST ~]# xe vm-uninstall vm=VM1 force=true
The following items are about to be destroyed
VM : e995f197-5730-9cfc-3491-c2768e02236f (VM1)
All objects destroyed
[root@XENHOST ~]# xe vm-uninstall vm=VM2 force=true
The following items are about to be destroyed
VM : ec6d123d-a3d5-aa11-9439-f4c44927a0fa (VM2)
All objects destroyed


Obviously be double sure that you have the correct list of VM's before you run this command.