Pages

Monday, 22 August 2011

XenServer 5.6 SP2 Install

Boot the computer from the installation CD and follow the initial boot messages and the Welcome to XenServer screen, select your keyboard layout for the installation.

Tip: Throughout the installation, quickly advance to the next screen by pressing F12. Use Tab to move between elements, and Space or Enter to select. For general help, press F1.


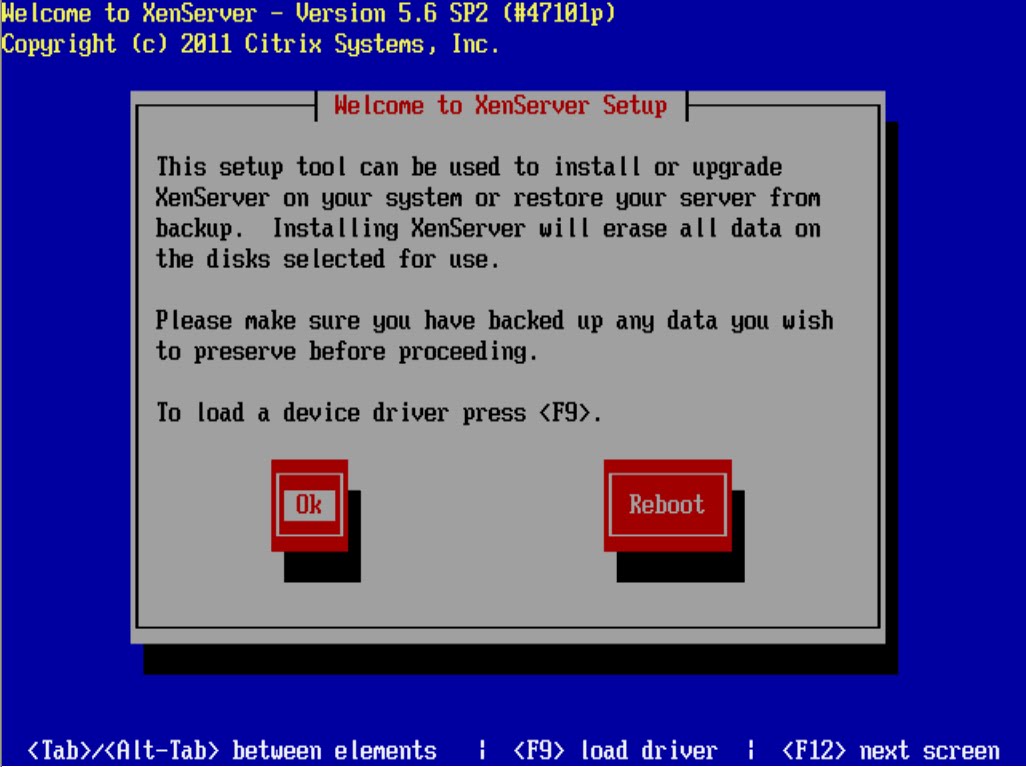
The Welcome to XenServer Setup screen is displayed.

XenServer ships with a broad driver set that supports most modern server hardware configurations.
However, if you have been provided with any supplemental packs containing additional essential drivers, press F9. The installer will then step you through installing the necessary drivers.
Once you have installed all of the required drivers, select Ok to proceed.

The XenServer End User License Agreement (EULA) is displayed. Use the Page Up and Page Down keys to scroll through and read the agreement. Choose Accept EUlA to proceed.


Select an installation action, as appropriate. You may see any of the following options:

• Perform clean installation
• Upgrade: if the installer detects a previously-installed version of XenServer, it offers the option to upgrade. For details on upgrading your XenServer host, see Upgrading XenServer.
• Restore: if the installer detects a previously-created backup installation, it offers the option to restore XenServer from the backup. For details, see the XenServer Administrator's Guide.

Make your selection, and choose Ok to proceed.

If you have multiple local hard disks, choose a Primary Disk for the installation. Select Ok.
Choose which disk(s) you would like to use for virtual machine storage. Information about a specific disk can be viewed by pressing F5.

If you want to use Thin Provisioning to optimize the utilization of available storage, select Enable thin provisioning. XenDesktop users are strongly recommended to select this option in order for local caching to work properly. For details, see XenServer and IntelliCache.
Choose Ok.


Select your installation media source


Indicate if you want to verify the integrity of the installation media. If you select Verify installation source, the MD5 checksum of the packages is calculated and checked against the known value. Verification may take some time. Make your selection and choose Ok to proceed.


Skip verification


Set and confirm a root password, which XenCenter will use to connect to the XenServer host. You will also use this password (with username "root") to log into xsconsole, the system configuration console.


Set up the primary management interface that will be used to connect to XenCenter.


Set up the primary management interface that will be used to connect to XenCenter.


Configure the Management NIC IP address by choosing Automatic configuration (DHCP) to configure the NIC using DHCP, or Static configuration to manually configure the NIC.


Select your time zone — the geographical area and then city. You can type the first letter of the desired locale to jump to the first entry that begins with this letter. Choose Ok to proceed.


If using NTP, either select NTP is configured by my DHCP server to have DHCP set the time server or enter at least one NTP server name or IP address in the fields below. Choose Ok.
Note: XenServer assumes that the time setting in the BIOS of the server is the current time in UTC.


Select Install XenServer.


From the Installation Complete screen, eject the installation CD (if installing from CD) and select Ok to reboot the server.

Friday, 15 July 2011

The MAC address challenge – XenDesktop on vSphere

http://blogs.citrix.com/2011/07/09/the-mac-address-challenge-xendesktop-on-vsphere/

http://kb.vmware.com/selfservice/microsites/search.do?language=en_US&cmd=displayKC&externalId=1024025

Wednesday, 22 June 2011

Deleting Multiple VM's from XenCenter

First use excel (or your choice of word editor) and create a list of all your VM's you would like to delete plus the added XE command options

xe vm-uninstall vm=VM1 force=true
xe vm-uninstall vm=VM2 force=true
xe vm-uninstall vm=VM3 force=true
xe vm-uninstall vm=VM4 force=true
xe vm-uninstall vm=VM5 force=true
xe vm-uninstall vm=VM6 force=true
xe vm-uninstall vm=VM7 force=true
xe vm-uninstall vm=VM8 force=true
xe vm-uninstall vm=VM9 force=true


Next open up a putty session to a Xen Host and copy all of the above next directly in to the putty session.

NOTE: Please be aware that the VM names are CaSe Sensitive.

As the text is processed you'll see each VM being delete and you can also view the VM's being deleted in XenCenter as each line of command runs in the putty session.

[root@XENHOST ~]# xe vm-uninstall vm=VM1 force=true
The following items are about to be destroyed
VM : e995f197-5730-9cfc-3491-c2768e02236f (VM1)
All objects destroyed
[root@XENHOST ~]# xe vm-uninstall vm=VM2 force=true
The following items are about to be destroyed
VM : ec6d123d-a3d5-aa11-9439-f4c44927a0fa (VM2)
All objects destroyed


Obviously be double sure that you have the correct list of VM's before you run this command.

Wednesday, 11 May 2011

ESXTOP logging to Windows File share

1. Create a share on a windows server.

2. Create a local user on the same server and give them full access to the share you just created.

3. On your ESX server enable SMB client (ports tcp:137-139,445) on your ESX firewall so that you can reach your windows share.


4. Logon your console or Putty with root user and create a new folder to store your .csv results.
mkdir /mnt/logging

5. To create the Windows mount point
mount -t cifs //Servername/ESXLogging /mnt/logging -o username=ESXLogging,password=L0gging

6. After you have setup the above you now need to run ESXTOP and point it to the mount point.
esxtop -b -d 10 -n 77760 >/mnt/logging/ESXSERVER_DATE.csv

A good online reference for this is http://kb.vmware.com/selfservice/microsites/search.do?language=en_US&cmd=displayKC&externalId=242.

Wednesday, 23 March 2011

Citrix Licensing Error - Event ID 1001,1004,11706

Please check out www.kaztechsolutions.co.uk for more of my technical posts, alternately please call us on 01932 268289. 

Recently I had an issue where our Licensing server was throwing the following warning/errors and it turns out it was an issue with SCOM 2007 R2 agent installed with Citrix MP 5.0 on the licensing server.

The version of licensing server that was running was 11.6 and once we removed the SCOM agent and restarted the the License server all of these error stopped.

Event Type: Warning
Event Source: MsiInstaller
Event Category: None
Event ID: 1001
Detection of product '{EE7A694A-15EE-4551-A267-EBF5904DD49D}', feature 'CitrixLicensingProductFeature' failed during request for component '{D0EBE218-FC25-5A69-A95A-C5C79CC68186}'

For more information, see Help and Support Center at http://go.microsoft.com/fwlink/events.asp.

Event Type: Warning
Event Source: MsiInstaller
Event Category: None
Event ID: 1004
Detection of product '{EE7A694A-15EE-4551-A267-EBF5904DD49D}', feature 'CitrixLicensingProductFeature', component '{213B3304-A395-438C-9510-BC621D799083}' failed. The resource 'HKEY_LOCAL_MACHINE\SOFTWARE\Citrix\LicenseServer\Install\Debug' does not exist.

For more information, see Help and Support Center at http://go.microsoft.com/fwlink/events.asp.

Event Type: Error
Event Source: MsiInstaller
Event Category: None
Event ID: 11706

Product: Citrix Licensing -- Error 1706. An installation package for the product Citrix Licensing cannot be found. Try the installation again using a valid copy of the installation package 'CTX_Licensing.msi'.

For more information, see Help and Support Center at http://go.microsoft.com/fwlink/events.asp.
Data:
0000: 7b 45 45 37 41 36 39 34 {EE7A694
0008: 41 2d 31 35 45 45 2d 34 A-15EE-4
0010: 35 35 31 2d 41 32 36 37 551-A267
0018: 2d 45 42 46 35 39 30 34 -EBF5904
0020: 44 44 34 39 44 7d DD49D}

Wednesday, 16 March 2011

How to delete a PVS

From any PVS server in the farm, browse to the C:\Program Files\Citrix\Provisioning Services Console directory via command prompt and run the following

mcli run markdown /p servername="name"

replace the "name" with the server that is no longer used, once you do this browse through the console, find the server, right click, delete.

Thursday, 10 March 2011

Helpful LINUX Commands

This is just some LINUX commands that i have been using on both ESX and XenServer

Control + R - Use this command if you cannot remember commands you have previously run on a host.

history | tail -n40 - Display the last 40 commands you have typed.

ls -lrt | grep "Mar 8" - List all file modified a certain date.

pwd - Shows current working directory.


df -h - displays size usage

Wednesday, 26 January 2011

Changing pool master

Go to the slave server that you want to use as pool master.

First disable HA on your XenServer Pool.

#xe pool-ha-disable

Now list UUID for all the hosts

#xe host-list

To designate a slave XenServer as the new pool master

# xe pool-designate-new-master host-uuid=("enter UUID number - without quotes"

If your pool master is down or unavailable, log in to a slave XenServer and enter the command below.

#xe pool-emergency-transition-to-master

Nopw you need to re-establish all connections to the slaves from the new pool master.

# xe pool-recover-slaves

Friday, 15 October 2010

VM won't start and now is in a Stuck State

From time to time Vm's can get stuck in a state where you cannot start, shutdown, reboot or even force a reboot or shutdown. When this happens from the console type: xe-toolstack-restart (note that your XenCenter will loose connection when you do this. Nothing will however happen to your running VMs)

Reconnect with XenCenter (or let it reconnect by itself) and you should see your VM no longer in a stuck state

Wednesday, 29 September 2010

Appliance lock Regkeys

When using the Citrix Appliance lock if you ever need to disable the Windows logon settings to stop using the PNAAgent at log on change the following reg key from

HKEY_LOCAL_MACHINE\SOFTWARE\Microsoft\Windows NT\CurrentVersion\Winlogon
"Shell"="C:\Program Files\Citrix\ICA Client\pnagent.exe"

To

HKEY_LOCAL_MACHINE\SOFTWARE\Microsoft\Windows NT\CurrentVersion\Winlogon
"Shell"="Explorer.exe"

This will enable Windows Explorer to start during Windows logon and not the PNAAgent.