Pages

Thursday, 19 April 2012

XenApp 6.5 - Enhanced Desktop Experience

Please check out www.kaztechsolutions.co.uk for more of my technical posts, alternately please call us on 01932 268289. 

To deploy hosted desktops with the Windows 7 look and feel and control desktop customization through Group Policy think about using XenApp's 6.5 new feature Enhanced Desktop Experience. 

When you install XenApp 6.5 the Windows Desktop Experience Integration role is installed by default through the Server Role Manager and the installation sequence performs the following tasks. 


  • Adds the Desktop Experience and XPS Viewer features to the Windows server configuration.
  • Moves the Citrix folder items in the Start menu to the Administrative Tools folder (including the Citrix AppCenter).
  • Creates a new Windows Theme file and sets the default wallpaper.
  • Starts the Windows Themes service and configures it to start automatically.
Now to get Enhanced Desktop Experience working do the following

1. First run the Set-ExecutionPolicy AllSigned command within powershell as this will allow you to run the Citrix powershell script that we need to run later.

 2.  Now change your directory to "C:\Program Files (x86)\Citrix\App Delivery Setup Tools\" and once you have changed directory run the following command  .\New-CtxManagedDesktopGPO.ps1 and wait for it to finish.

3.  Once the command has finished you are ready to apply one of the following group polices to the OU that you require.

CtxStartMenuTaskbarUser - Enables the Windows 7 look and feel for published desktops. It also changes the pinned shortcuts on the Taskbar and configures the user's Start menu to match the Windows 7 environment. This GPO includes a script that executes when a user logs on to the server for the first time. To ensure the script executes correctly, the PowerShell execution policy on the server must be set to AllSigned.

CtxPersonalizableUser - Configures the user account that is accessing the XenApp server. It configures Windows policies to limit the available Control Panel applets and restricts users from installing programs, viewing properties, scheduling tasks, or shutting down the server.

CtxRestrictedUser - Includes most of the policies from the CtxPersonalizableUser GPO. Additionally, this GPO configures the Desktop wallpaper policy to prevent users from personalizing their desktops and prevents users from modifying settings for the Start menu and Taskbar.

CtxRestrictedComputer - Configures certain restrictions on the XenApp servers allocated to the tenant. This GPO restricts users from accessing Windows Update or removable server drives.

4.  OK before i apply any of the policies to an OU lets have a look at XenApps standard published desktop that a user would get without these GPO's applied and as you can see its a standard Windows Server 2008 desktop.

5.  Looking at the new GPO's that the powershell script created you can see that its automatically created the 4 GPO (CtxStartMenuTaskbarUser, CtxPersonalizableUser, CtxRestrictedUser, CtxRestrictedComputer).  Now I've applied CtxPersonalizableUser and CtxStartMenuTaskbarUser to the OU that the XA server's are in and if you have another GPO to handle general XA GPO's (in my case the XA Servers GPO) make sure that this GPO has the loopback processing mode enabled and set to replace so that the settings within the CtxPersonalizableUser GPO apply correctly.


 6.  Now as you can see once the GPO's are applied currently to the OU and a user lunches their published desktop you can now see that the Enhanced Desktop Experience is working correctly.


NOTE 1: At first I did have a bit of a problem getting this to actually work currently with a users profile that was already created but after installing this HOTFIX it seemed to work successfully.  If you are still having issues after applying this hotfix try to delete/rename the local profile/roaming/UPM profile and get the user to log in with a fresh profile to test.


Monday, 16 April 2012

XenApp 6.5 Pre-Launch

Please check out www.kaztechsolutions.co.uk for more of my technical posts, alternately please call us on 01932 268289. 

Now setting up Session Pre-Launch is a every simple task but I though I would would just add a bit more regarding the topic along with some screen shoots of how I set it up. 


The pre-launch feature allows a pre-launch session to be created when a user logs on, pre-launch session reduces the launch time of the first application. The default application ctxprelaunch.exe runs in the session, but is not visible to the user.  Also keep in mind that once a pre-launch session starts it does take a XenApp license regardless of whether a user launches an app or not and this setting will apply to all users.


1.   First right click on an App and select other tasks> Create Pre-Launch application.


2.  It will now create a PreLaunch-AppName application, me personally i like to change the name of this to PreLaunch-FarmName (Or something more descriptive) since you only need to create one PreLaunch per farm.


 3.  Next add the Pre-launch Disconnect Timer Interval policy - Amount of time before the pre-launch application disconnects the session (60 minutes by default). Once disconnected, the session gives up the XenApp license. When a user launches an application, the session is reconnected. This timer does not disconnect a session if a user launches an application. If the interval is not configured, the pre-launch session is not ever disconnected.

 4.  Next add the Pre-launch Terminate Timer Interval policy - Maximum amount of time before the pre-launch application exits (60 minutes by default). Starting a user application in the session also terminates the pre-launch application. Once the pre-launch application exits, the session remains alive if the user's applications are running or if you configured session lingering.

 5.  Now if you are setting this up for the first time remember to restart your receiver and once you do have a look at the connected users


NOTE: Customizing the pre-launch feature using Administrative Templates is not supported. However, you can change the pre-launch configuration by modifying the registry values, located at:

For 32-bit: HKEY_LOCAL_MACHINE\SOFTWARE\Citrix\ICA Client\Prelaunch and HKEY_CURRENT_USER\Software\Citrix\ICA Client\Prelaunch

For 64-bit: HKEY_LOCAL_MACHINE\SOFTWARE\Wow6432Node\Citrix\ICA Client\Prelaunch

Thursday, 12 April 2012

XenApp 6.5 Step by Step - Step 4 Configuring the Farm

Please check out www.kaztechsolutions.co.uk for more of my technical posts, alternately please call us on 01932 268289. 

Step 4 - Configuring the farm. 

Ok let me stress that this is only a test environment and there is a hell of a lot more configuration required for a XenApp environment to run smoothly, you now have to start to consider things like Citrix policies, Windows Desktop Experience, session pre-launch, HDX configurations are just among a few that spring to mind.  I will be blogging about the above soon so if this is something you would like to see documented keep your eyes peeled on ITGerrish.  

1.  On the XenApp server click on configure to start to build the XenApp Farm.

2.  As this is the first server in a new farm I have to select Create a new server farm.

3.  Give the Farm a name and make sure you're happy with the first Citrix Administrator that you are adding to the site.

4.  As this is only a test environment I will be using SQL Express as it fits my requirements but if you need to know more information regarding the setup of SQL have a look here.

5.  Add in the credentials of the users who will be used to connect to the SQL Express DB. 

6.  I've left the shadowing options as the default but if you want some more information regarding the setup of shadowing have a look here.

NOTE: By default, shadowing is enabled. Shadowing restrictions are permanent. If you disable shadowing, or change shadowing features when configuring XenApp, you cannot change those settings later. You must reinstall and reconfigure XenApp on the server to change shadowing restrictions.

7a.  As this is the first XenApp Server in the farm it will be the data collector.

7b.  As i choose to enable XML integration i cannot change the XML server port as this now shares this with IIS.

7c.  I added in the WI address that we created in Step 3.

7d. I left the remote desktop users as default too.

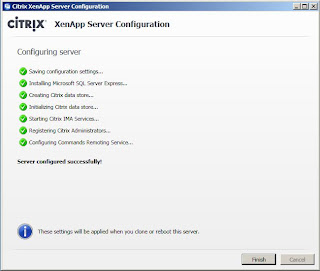
8.  Review the settings you have just selected and choose apply.

9.  Wait for the configurations to finish and this can take a while

10.  The installation is now finished and you need to restart your XenApp Server.

11.  Looking back at the Server Role Manager you can see that the XenApp server requires a Reboot.

12.  Once you have logged back in with the same user account that you configured the XenApp with you will see that a task are now completed.

You are doing ready to start configuring your XenApp environment and i hope you found the step by step guild helpful.

XenApp 6.5 Step by Step - Step 1 Installation

Please check out www.kaztechsolutions.co.uk for more of my technical posts, alternately please call us on 01932 268289. 

This is a installation of XenApp 6.5 step by step in a test lab setup within VMware Workstation which I've built to help me play\view some of the new features within XenApp 6.5.

Before I begin the install of XenApp 6.5 I've configured the following first
  • A Windows 2008 domain (CTXLAB.COM).
  • 2 Windows 2008 R2 64bit servers configured with my customizations and SP1 installed for the XenApp servers and the web interface.
  • A Windows 2008 R2 server for the license server.
  • A Windows 7 SP1 64bit.
Step 1 - Installing XenApp 6.5 has a few prerequisites but I'm going to let the XenApp Server Role Manager (using the Server Role Installer) to automatically install XenApp prerequisites.  Lets get started but if you are planning a deployment of XenApp 6.5 have a look at my planning guide which give you a list of questions you need to ask before even starting.

1. Insert the XenApp 6.5 media and click on install XenApp Server.

 2. Since we added no prerequisites you will be prompted to install .Net 3.5 SP1, click OK.

3.  Once the install of .Net 3.5 has finished and the Citrix XenApp Server Role Manager starts click on Add Server Roles.

4.  You will be prompted to select your edition of XenApp.

5. Agree to the license and click Next.

6.  As this is a test environment I'm going to install the XenApp and Web Interface role on the same server but if this is a production environment have a look here to see how you can split the roles out. 
 7.  I've added the XML integration as this let the Citrix XML port and IIS share port 80, if you have a requirement to separate these do not select it.

 8.  You will now be prompted about how the installation is going to plan out and what restarts are required.

9.  Review what is going to be installed and click next.

10.  As I never added some of the prerequisites the installation requires a restart.

11.  Once you clicked on finish on the previous screen you will now be prompted to Reboot the XenApp server, click on the Reboot link within role manager.

12.  Make sure you log back in to the server with the user account the you used to install XenApp with and you will be prompted to resume install, click on the resume install link.

13.  You will be presented with now what is going to be installed after the restart, click Install.

14.  Your XenApp 6.5 install is now completed, click finish

 15.  You will now be asked to configure the XenApp licensing and the Web Interface since we select this during the install. 

Now go to Step 2 to see how to configure Licensing. 


XenApp 6.5 Step by Step - Step 2 Licensing

Please check out www.kaztechsolutions.co.uk for more of my technical posts, alternately please call us on 01932 268289. 

Now moving on to Step 2 - Licensing. 

Once your XenApp Server installation is finished it's time to configure Licensing for your environment.  Please keep in mind that this is just a test environment and I will be only configuring the Citrix licensing side of things so if you plan to introduce this in to production consider your MS Remote Desktop Services too.  RDS does come with a 120 grace period so this is prefect for a test environment.

NOTE: If you are adding in Licenses to the server MAKE SURE that your License Server's computer name is ExAcTlY the same as your host name on your MyCitrix license section

1.  Once the XenApp installation has finished you will be prompted to configure the license side of things but first you need to setup a Windows Server with the Citrix License role installed.

2. I have a Windows 2008 R2 server configured to handle the licensing side of things so first thing first insert the XenApp 6.5 media.  Now the option to install the license side of things you have to drill down to find the option so click on >Manually install components>Common Components>Citrix Licensing.

NOTE: Now you need to install the Citrix Licnese server but first back sure you have .NET Framework 3.5.1 features through the add features wizard.


3.  Accept the license agreement and click next.

4.  Choose your installation directory.

5.  Click finish to the License server installation.

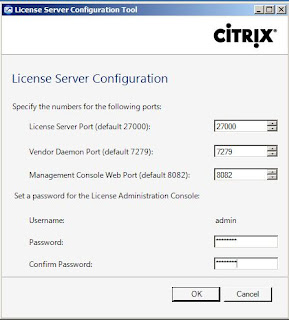
6.  Once the installation is finished you will be prompted with the configuration ports and admin password for the License Server.  


7.  Before logging on to the license console if you require to copy your License file to the MyFiles path to enable Citrix products copy it to C:\Program Files (x86)\Citrix\Licensing\MyFiles.  Now locate the License Administration Console under the all programs in your start menu, once the console starts locate the Administration link in the top right of the page and you will be prompted with log on page.  Add in the credentials that you set in section 6.


8. Once in the Administration section of the console locate the Vendor Deamon Configuration section.

9.  Browse to the directory you copied your license file and select your license, now choose to "overwrite license file on license server" and click on import license.

10.  Your license should now have imported, click on OK to message.

11.  Now restart the Citrix License Server Service and then look back at the dashboard of the License console and you should see all your licenses checked in.

12. Now go back to the XenApp Server you configured in Step 1 and click on Specify Licensing.

13.  Add in the license server name and the port number and click on Test connection.  If all connects fine click next and specify your edition and then click finish.

14.  Now looking back at the XenApp Server you will see that the Licensing is now specified.


Now that the Licensing is configured lets move to Step 3 - Configuring the Web Interface.